My Ultimate Self-Hosted AI Chat Stack
Introduction
I use ChatGPT, Copilot and Claude interchangeably depending on my mood, topic, or data sensitivity. But these services run on someone else's infrastructure, are trained on my data, and are impossible to run offline. The moment you start using AI for anything sensitive — internal docs, company data, personal projects — you get pushed towards a single vendor.
I wanted something different: a single stack that gives me control over which LLM I use, without separate subscription fees, running on my own hardware. When the topic is sensitive like internal docs, company strategy or even personal projects I want a model that runs locally, where no data leaves my machine. And importantly: if it runs on my machine, it should work on yours too.
After a few iterations, I have that stack. I called it CustomAIChat (naming things is hard) and this post walks through every component, why it's there, and how to get it running yourself.
The stack at a glance
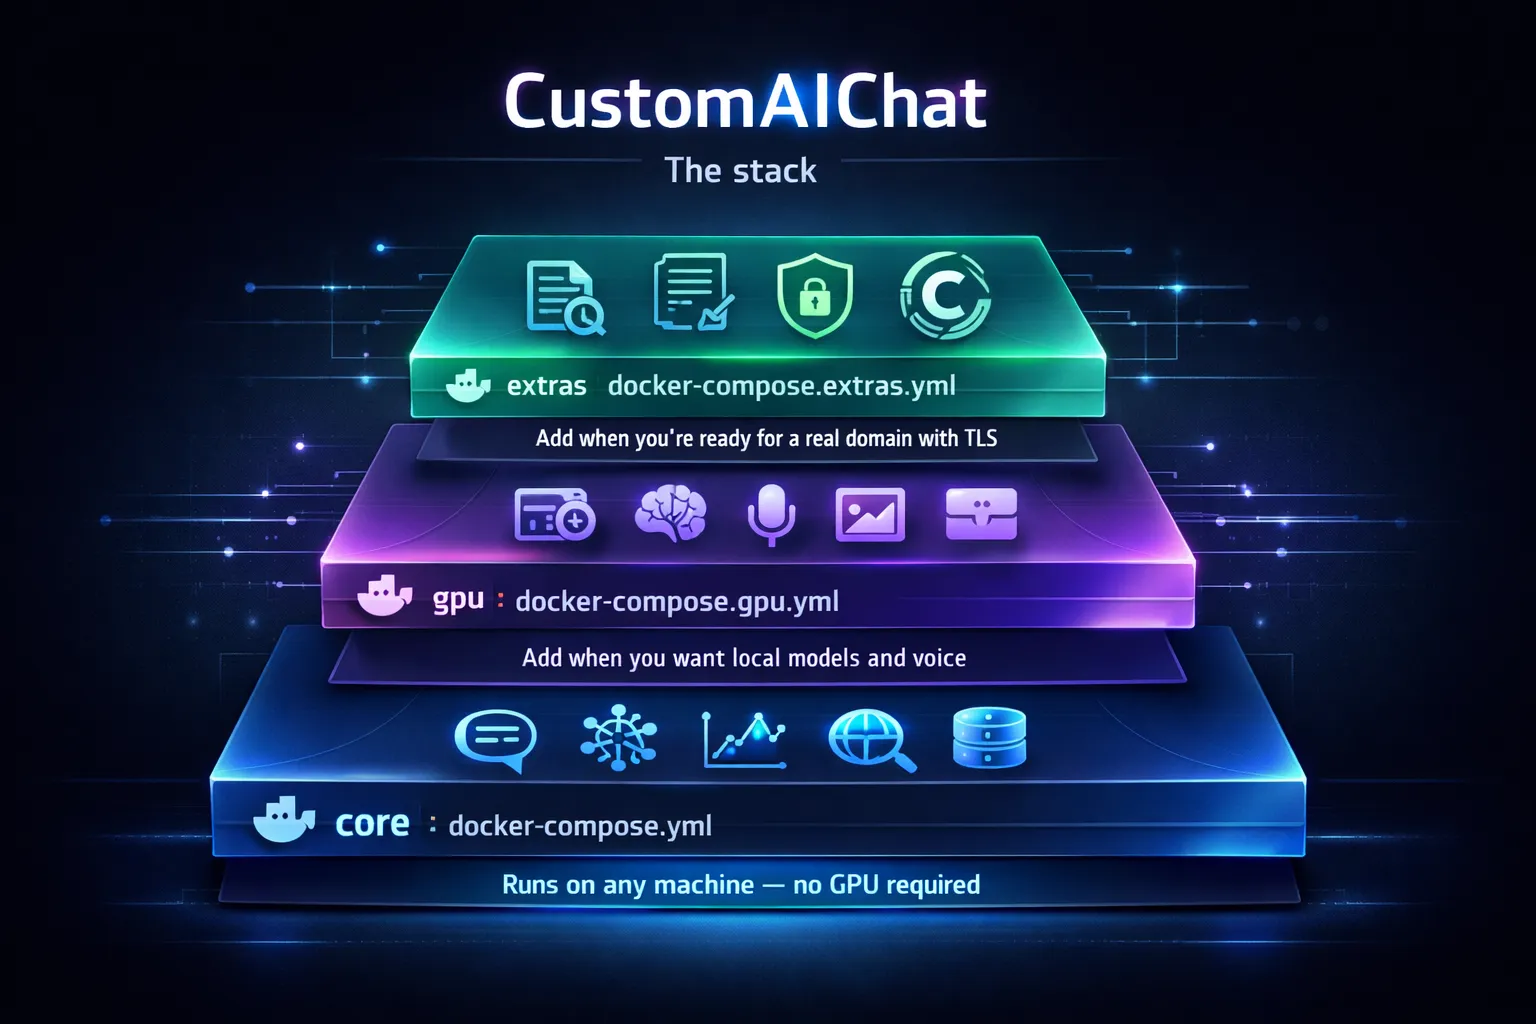
Most self-hosted AI setups solve one problem well and leave integration to the user. CustomAIChat is a Docker Compose project split into multiple tiers so you can start lean and expand as your hardware allows:
| Tier | Compose file | What it adds |
|---|---|---|
core | docker-compose.yml | Chat UI, LLM proxy, observability, web search, databases |
gpu | Individual overlays | Local LLM inference, speech-to-text, image generation |
extras | docker-compose.extras.yml | Document research (Open Notebook), HTTPS reverse proxy (Caddy) |
The core tier runs on any machine with no GPU required. The GPU tier is split into individual Docker Compose overlays (one per service) so you can run exactly what fits on your hardware. On my 8 GB GPU, running Ollama and ComfyUI at the same time will not work, so the scripts let me swap between them with a single command. I must admit that, although I touched ComfyUI in the past, I haven't yet generated images with this workflow. But more on these features below.
Core tier
Open WebUI — the frontend
Open WebUI is the chat interface. It looks and feels like ChatGPT but connects entirely to your own backends. You get conversation history with folders and search, per-message web search, image generation in chat, voice input, file uploads with RAG, and full user management with admin roles.
One thing to be aware of: the first user to register becomes the admin.
LiteLLM — the model proxy
LiteLLM sits between Open WebUI and every AI provider. OpenAI, Ollama local models, Azure AI Foundry, Anthropic, and 100+ more all sit behind a single endpoint. Open WebUI only talks to LiteLLM; switching or adding models is a config change, not a code change.
It also handles cost-based routing (cheap requests go to cheap models automatically), Redis caching for repeated responses, and sends every call to Langfuse for tracing. Honestly, the feature set is way more than this stack needs, but it's fun to explore the capabilities of this software.
The current config covers Azure OpenAI GPT models and GPT Image via Azure AI Foundry. When Ollama is started, the scripts automatically swap LiteLLM to a second config file (config.local.yaml) that adds local models to the routing table. When Ollama stops, LiteLLM switches back to the cloud-only config so you don't see broken model entries in the UI. Unfortunately this causes some duplicate configurations, but it is the least hassle for now.
Example config for the 'cloud based' configuration:
# =============================================================================
# LiteLLM Proxy Configuration
# Docs: https://docs.litellm.ai/docs/proxy/configs
# =============================================================================
#
# This config defines all available models routed through LiteLLM.
# Models appear in OpenWebUI's model selector automatically.
#
# After editing, restart LiteLLM: docker compose restart litellm
# =============================================================================

# --- Observability: send all calls to Langfuse ---
litellm_settings:
  drop_params: true
  set_verbose: false
  success_callback: ["langfuse"]
  failure_callback: ["langfuse"]
  cache: true
  cache_params:
    type: redis
    host: redis
    port: 6379
    password: os.environ/REDIS_PASSWORD

# --- Environment variable references ---
environment_variables:
  LANGFUSE_PUBLIC_KEY: os.environ/LANGFUSE_PUBLIC_KEY
  LANGFUSE_SECRET_KEY: os.environ/LANGFUSE_SECRET_KEY
  LANGFUSE_HOST: os.environ/LANGFUSE_HOST

# --- General proxy settings ---
general_settings:
  master_key: os.environ/LITELLM_MASTER_KEY
  database_url: os.environ/LITELLM_DATABASE_URL
  alerting: ["log"]

model_list:

  - model_name: azure/gpt-5.4-nano-2
    litellm_params:
      model: azure/gpt-5.4-nano-2            # format: azure/<your-deployment-name>
      api_base: os.environ/AZURE_API_BASE
      api_key: os.environ/AZURE_API_KEY
      api_version: os.environ/AZURE_API_VERSION

  - model_name: azure/gpt-5.3-codex
    litellm_params:
      model: azure/gpt-5.3-codex
      api_base: os.environ/AZURE_API_BASE
      api_key: os.environ/AZURE_API_KEY
      api_version: preview

  - model_name: azure/gpt-5.4-mini
    litellm_params:
      model: azure/gpt-5.4-mini
      api_base: os.environ/AZURE_API_BASE
      api_key: os.environ/AZURE_API_KEY
      api_version: os.environ/AZURE_API_VERSION

  # --- Azure OpenAI Image Generation ---
  - model_name: azure/gpt-image-1.5
    litellm_params:
      model: azure/gpt-image-1.5       # Azure OpenAI deployment name
      api_base: os.environ/AZURE_API_BASE
      api_key: os.environ/AZURE_API_KEY
      api_version: os.environ/AZURE_API_VERSION
    model_info:
      mode: image_generation

  # --- Azure AI Foundry Serverless — FLUX.2-pro ---
  - model_name: azure/flux-2-pro
    litellm_params:
      model: azure_ai/FLUX.2-pro
      api_base: os.environ/AZURE_AI_FOUNDRY_BASE
      api_key: os.environ/AZURE_API_KEY
    model_info:
      mode: image_generation

# =============================================================================
# ROUTER SETTINGS (load balancing, fallbacks)
# =============================================================================
router_settings:
  routing_strategy: "cost-based-routing"  # options: "priority", "round_robin"
  num_retries: 2
  timeout: 120
And the local config, with the added Ollama models:
# =============================================================================
# LiteLLM Proxy Configuration — Local Models Enabled
# Docs: https://docs.litellm.ai/docs/proxy/configs
# =============================================================================
#
# This config extends the cloud-only config.yaml with local Ollama models.
# It is mounted automatically when you run:
#   .\scripts\start.ps1 gpu-start ollama
#
# Pull models first:
#   docker exec ai-ollama ollama pull gemma4
#   docker exec ai-ollama ollama pull gemma4:e2b
#   docker exec ai-ollama ollama pull llama3.2
# =============================================================================

# --- Observability: send all calls to Langfuse ---
litellm_settings:
  drop_params: true
  set_verbose: false
  success_callback: ["langfuse"]
  failure_callback: ["langfuse"]
  cache: true
  cache_params:
    type: redis
    host: redis
    port: 6379
    password: os.environ/REDIS_PASSWORD

# --- Environment variable references ---
environment_variables:
  LANGFUSE_PUBLIC_KEY: os.environ/LANGFUSE_PUBLIC_KEY
  LANGFUSE_SECRET_KEY: os.environ/LANGFUSE_SECRET_KEY
  LANGFUSE_HOST: os.environ/LANGFUSE_HOST

# --- General proxy settings ---
general_settings:
  master_key: os.environ/LITELLM_MASTER_KEY
  database_url: os.environ/LITELLM_DATABASE_URL
  alerting: ["log"]

# =============================================================================
# MODEL DEFINITIONS
# =============================================================================

model_list:

  - model_name: azure/gpt-5.4-nano-2
    litellm_params:
      model: azure/gpt-5.4-nano-2
      api_base: os.environ/AZURE_API_BASE
      api_key: os.environ/AZURE_API_KEY
      api_version: os.environ/AZURE_API_VERSION

  - model_name: azure/gpt-5.3-codex
    litellm_params:
      model: azure/gpt-5.3-codex
      api_base: os.environ/AZURE_API_BASE
      api_key: os.environ/AZURE_API_KEY
      api_version: preview

  - model_name: azure/gpt-5.4-mini
    litellm_params:
      model: azure/gpt-5.4-mini
      api_base: os.environ/AZURE_API_BASE
      api_key: os.environ/AZURE_API_KEY
      api_version: os.environ/AZURE_API_VERSION

  - model_name: azure/gpt-image-1.5
    litellm_params:
      model: azure/gpt-image-1.5
      api_base: os.environ/AZURE_API_BASE
      api_key: os.environ/AZURE_API_KEY
      api_version: os.environ/AZURE_API_VERSION
    model_info:
      mode: image_generation

  - model_name: azure/flux-2-pro
    litellm_params:
      model: azure_ai/FLUX.2-pro
      api_base: os.environ/AZURE_AI_FOUNDRY_BASE
      api_key: os.environ/AZURE_API_KEY
    model_info:
      mode: image_generation

  - model_name: gemma4:e2b
    litellm_params:
      model: ollama/gemma4:e2b
      api_base: http://ollama:11434

  - model_name: qwen3.5:9b
    litellm_params:
      model: ollama/qwen3.5:9b
      api_base: http://ollama:11434


# =============================================================================
# ROUTER SETTINGS (load balancing, fallbacks)
# =============================================================================
router_settings:
  routing_strategy: "cost-based-routing"
  num_retries: 2
  timeout: 120
SearXNG — private web search
SearXNG is a self-hosted meta-search engine that queries Bing, Google, DuckDuckGo and others simultaneously without exposing your identity to any of them.
In Open WebUI, clicking the globe icon on any message triggers a SearXNG search and injects results into the prompt context. The model gets current information; the search engines get an anonymous request. No API keys, no tracking, no per-search billing. This is how you give your LLM web access without giving away your data.
The setup can be finnicky, but I have found a good mix of speed and accuracy. It's in the repo so check it out.
GPU tier — per-service overlays
The original version of this stack had a single docker-compose.gpu.yml that started Ollama, Whisper, and ComfyUI together. That works fine if you have 16+ GB of VRAM, but on my 8GB RTX 4070 GPU it was not proving impossible to run multiple models at the same time.
The fix: each GPU service now has its own Docker Compose overlay file. The management scripts support gpu-start, gpu-stop, and gpu-switch commands that bring individual services up or down without touching the core stack.
| Overlay | Service | VRAM usage |
|---|---|---|
docker-compose.ollama.yml | Ollama (local LLMs) | Depends on model (~7-10 GB for Gemma 4) |
docker-compose.whisper.yml | Whisper (speech-to-text) | ~1 GB on base model |
docker-compose.comfyui.yml | ComfyUI (image generation) | ~6.5 GB for SDXL |
docker-compose.litellm-local.yml | LiteLLM config swap | — |
The practical workflow on an 8 GB GPU:
# Day-to-day: core stack + Ollama for private local chat
.\scripts\start.ps1 up core
.\scripts\start.ps1 gpu-start ollama
Need to generate images? Stop Ollama, start ComfyUI:
.\scripts\start.ps1 gpu-switch comfyui
Done with images, back to local LLMs:
.\scripts\start.ps1 gpu-switch ollama
Whisper is lightweight enough to run alongside Ollama:
.\scripts\start.ps1 gpu-start whisper
The gpu-switch command handles the handoff: it stops the conflicting service first, frees the VRAM, then starts the new one. Note: it may take a few minutes for models to unload and load back in so don't swap too much.
Ollama — local LLMs, zero data sharing
Ollama is the reason the GPU tier exists. It runs open-weight models locally — no API keys, no usage tracking, no data leaving your machine. Every prompt and every response stays on your hardware.
This matters more than it sounds. When I'm working on something sensitive like a client proposal, internal architecture notes, code with proprietary logic, I switch to a local model instead of sending it to OpenAI or Azure as per my company's policy.
The model I've been running since last week is Gemma 4 from Google DeepMind, and honestly, it holds its own against ChatGPT for the tasks I throw at it. Another good contender is Qwen 3.5
Gemma 4 — frontier intelligence on a single GPU
Gemma 4 is Google DeepMind's latest open model family and it punches well above its weight class. The E4B variant (4.5 billion effective parameters) fits on a single consumer GPU and delivers reasoning, coding, and multimodal understanding that genuinely competes with cloud models I'm paying for.
What makes Gemma 4 stand out:
- Multimodal — processes both text and images, so I can paste screenshots into the chat
- 128K context window — long enough for full architecture documents or meeting transcripts
- Configurable thinking mode — can show its reasoning chain or just give the answer
- Native function calling — supports agentic workflows and tool use
- Two edge sizes — E2B (2.3B effective, 7.2 GB) fits comfortably on 8 GB; E4B (4.5B effective, 9.6 GB) uses most of it
For drafting text, reviewing code, answering questions about documents Gemma 4 E4B gives me results comparable to what I get from GPT-5.4-mini through Azure. The reasoning benchmarks back this up: 69.4% on MMLU Pro, 42.5% on AIME 2026, and 52% on LiveCodeBench v6. These aren't frontier-model numbers, but for a model that runs entirely on my own GPU with zero latency to the cloud, it's remarkable.
I pull it with:
docker exec ai-ollama ollama pull gemma4          # E4B — default, needs most of 8 GB
docker exec ai-ollama ollama pull gemma4:e2b      # E2B — lighter, comfortable on 8 GB
Both appear in Open WebUI automatically once Ollama is started via gpu-start ollama.

Whisper — speech to text
The Whisper overlay adds a dedicated Whisper ASR service for processing microphone input from Open WebUI. GPU acceleration makes transcription near real-time even on the large-v3 model.
The overlay also reconfigures OpenWebUI automatically — when you run gpu-start whisper, OpenWebUI is recreated with the STT environment variables pointing at the Whisper service. When you run gpu-stop whisper, OpenWebUI goes back to its default (no dedicated STT).
# .env — choose your accuracy/speed tradeoff
WHISPER_ASR_MODEL=large-v3   # best accuracy
# WHISPER_ASR_MODEL=medium   # faster
# WHISPER_ASR_MODEL=base     # fastest
The core tier works without it because Open WebUI has a built-in CPU Whisper fallback but the dedicated service is noticeably faster. To be honest: I haven't tried it out yet. I'm not used to talk to my computer yet.
ComfyUI — local image generation
ComfyUI handles local Stable Diffusion inference. Drop any .safetensors checkpoint into data/comfyui/models/ and it's immediately available. Supports SDXL, SD 1.5, FLUX, and anything else you throw at it. The overlay starts ComfyUI with the --lowvram flag by default, which helps on 8 GB cards.
For cloud image generation, LiteLLM routes to Azure GPT Image 1.5 or Azure AI Foundry FLUX.2-pro. Pick your model in the Open WebUI settings.
Langfuse — observability
Langfuse receives a trace for every LLM call that passes through LiteLLM. The dashboard gives you input/output text, latency per model, token counts and cost per call, per-user breakdowns, and error rates with retry patterns.
This is invaluable when something behaves unexpectedly. You can replay the exact call, see the full prompt, and compare how different models respond. The stack includes ClickHouse as an analytics backend so trace queries stay fast even with thousands of entries.
Both Langfuse and ClickHouse are optional but once you see the possibilities it is good to keep them running. You get a much better understanding of the inner workings of the process of LLMs.
Open Notebook — document research
Open Notebook is a self-hosted alternative to Google NotebookLM. Upload PDFs, web pages, or text files and have the LLM answer questions across them. It connects to LiteLLM, so it uses the same model pool as your chat.
This is where the stack really shines for work: meeting transcripts, architecture docs, long reports can be used and indexed without sending data to public providers. I'm researching the OpenWebUI RAG functionality though to see if this is still needed.
Extras tier
Caddy — HTTPS reverse proxy
Caddy 2 proxies every service behind a single domain and handles TLS automatically via Let's Encrypt. Going from localhost to a public domain is one variable:
# .env
CADDY_DOMAIN=ai.example.com
Caddy reads this, configures HTTPS with a valid certificate, and handles renewals automatically.
The databases
The stack uses four data stores, each picked for a specific reason:
| Database | Used by | Purpose |
|---|---|---|
| PostgreSQL 16 | LiteLLM, Langfuse | Primary data store |
| Redis 7 | LiteLLM | Response caching, rate limiting |
| ClickHouse 24 | Langfuse | High-volume analytics traces |
| SeaweedFS | Langfuse | S3-compatible object storage for media and events |
All data lands in ./data/ on the host. Everything survives container restarts and updates.
Getting started
Prerequisites
- Docker ≥ 24.0 and Docker Compose ≥ 2.20
- NVIDIA GPU + NVIDIA Container Toolkit (GPU tier only)
- 16 GB RAM minimum for core; 32 GB recommended with GPU tier
- GPU with at least 8GB of VRAM
1. Clone and configure
git clone https://github.com/jdgoeij/CustomAIChat.git
cd CustomAIChat
cp .env.example .env
Open .env and fill in your secrets. Every variable has an inline comment. At minimum you need POSTGRES_PASSWORD and REDIS_PASSWORD (strong random strings), a LITELLM_MASTER_KEY (the API key all clients use), Langfuse auth secrets (LANGFUSE_SECRET_KEY, LANGFUSE_PUBLIC_KEY, LANGFUSE_SALT), and your Azure OpenAI or OpenAI credentials if you want cloud models from day one.
2. Start the stack
Core only (no GPU required)
.\scripts\start.ps1 up core
Start core, then add individual GPU services:
.\scripts\start.ps1 up core
.\scripts\start.ps1 gpu-start ollama    # local LLMs
.\scripts\start.ps1 gpu-start whisper   # speech-to-text
Switch between heavy services on 8 GB GPUs:
.\scripts\start.ps1 gpu-switch comfyui # stops Ollama, starts ComfyUI
Everything including Caddy (needs ≥16 GB VRAM)
.\scripts\start.ps1 up all
Once all containers are healthy, you'll see:
✅ Open WebUI       → http://localhost:3000
✅ Langfuse         → http://localhost:3001
✅ Open Notebook    → http://localhost:3002
✅ LiteLLM API      → http://localhost:4000
✅ SearXNG          → http://localhost:8080
3. First-run checklist
- Open WebUI at
:3000— register your admin account (first registration wins) - Langfuse at
:3001— create your organisation and generate an API key pair - Paste Langfuse keys back into
.envand restart:.\scripts\start.ps1 up core - Pull a local model:
docker exec ai-ollama ollama pull gemma4 - Or the lighter variant for 8 GB GPUs:
docker exec ai-ollama ollama pull gemma4:e2b - Drop Stable Diffusion checkpoints into
data/comfyui/models/checkpoints/
4. Configuring Open WebUI
Once everything is running, Open WebUI needs to know about SearXNG and your image generation backend. Neither works out of the box — but both are quick to set up.
5. Web search with SearXNG
Open WebUI talks to SearXNG over HTTP and expects JSON responses. The Docker Compose stack already handles networking between the containers, but SearXNG ships with JSON output disabled by default. Without it, Open WebUI gets HTML back and throws a 403 Forbidden error.
First, make sure SearXNG has started at least once so it generates its config files. Then edit data/searxng/settings.yml and add json to the formats list:
# data/searxng/settings.yml
search:
  formats:
    - html
    - json    # required for Open WebUI
Restart SearXNG after this change. Then in Open WebUI, go to Admin Panel → Settings → Web Search and configure:
- Web Search Engine:
SearXNG - SearXNG Query URL:
http://searxng:8080/search?q=<query>
That's it. The globe icon in chat now triggers a private web search. Toggle it per message — it's not on by default.
6. Image generation
Open WebUI supports multiple image generation backends. Which one you configure depends on whether you're running the GPU tier (ComfyUI for local generation) or using cloud models through LiteLLM.
7. Option A: Cloud image generation via LiteLLM
If you have Azure GPT Image 1.5 or another OpenAI-compatible image model configured in LiteLLM, point Open WebUI to LiteLLM's API:
- Go to Admin Panel → Settings → Images
- Toggle Image Generation on
- Set Image Generation Engine to
OpenAI - Set API Base URL to
http://litellm:4000/v1 - Set API Key to your
LITELLM_MASTER_KEY - Enter the model name exactly as it appears in your LiteLLM config (e.g.
azure/gpt-image-1.5) - Set Image Size to
1024x1024
For Azure specifically, make sure your LiteLLM config uses API version 2025-04-01-preview or later because older versions don't support the required parameters.
7. Option B: Local generation with ComfyUI
If you're running the GPU tier with ComfyUI:
- Go to Admin Panel → Settings → Images
- Toggle Image Generation on
- Set Image Generation Engine to
ComfyUI - Set ComfyUI Base URL to
http://comfyui:8188 - Import your workflow JSON (exported from ComfyUI in API Format — not the standard save)
The API Format export is important: in ComfyUI, enable "Dev mode Options" in settings first, then use "Save (API Format)" from the menu. The standard JSON export won't work.
Drop your .safetensors checkpoints into data/comfyui/models/checkpoints/ and they appear immediately. No restart needed.
8. Keeping image models out of the chat selector
Once you've configured the image backend, you'll notice the image models show up in the main model selector alongside your chat models. That's not ideal and you don't want to accidentally start a conversation with an image-only model.
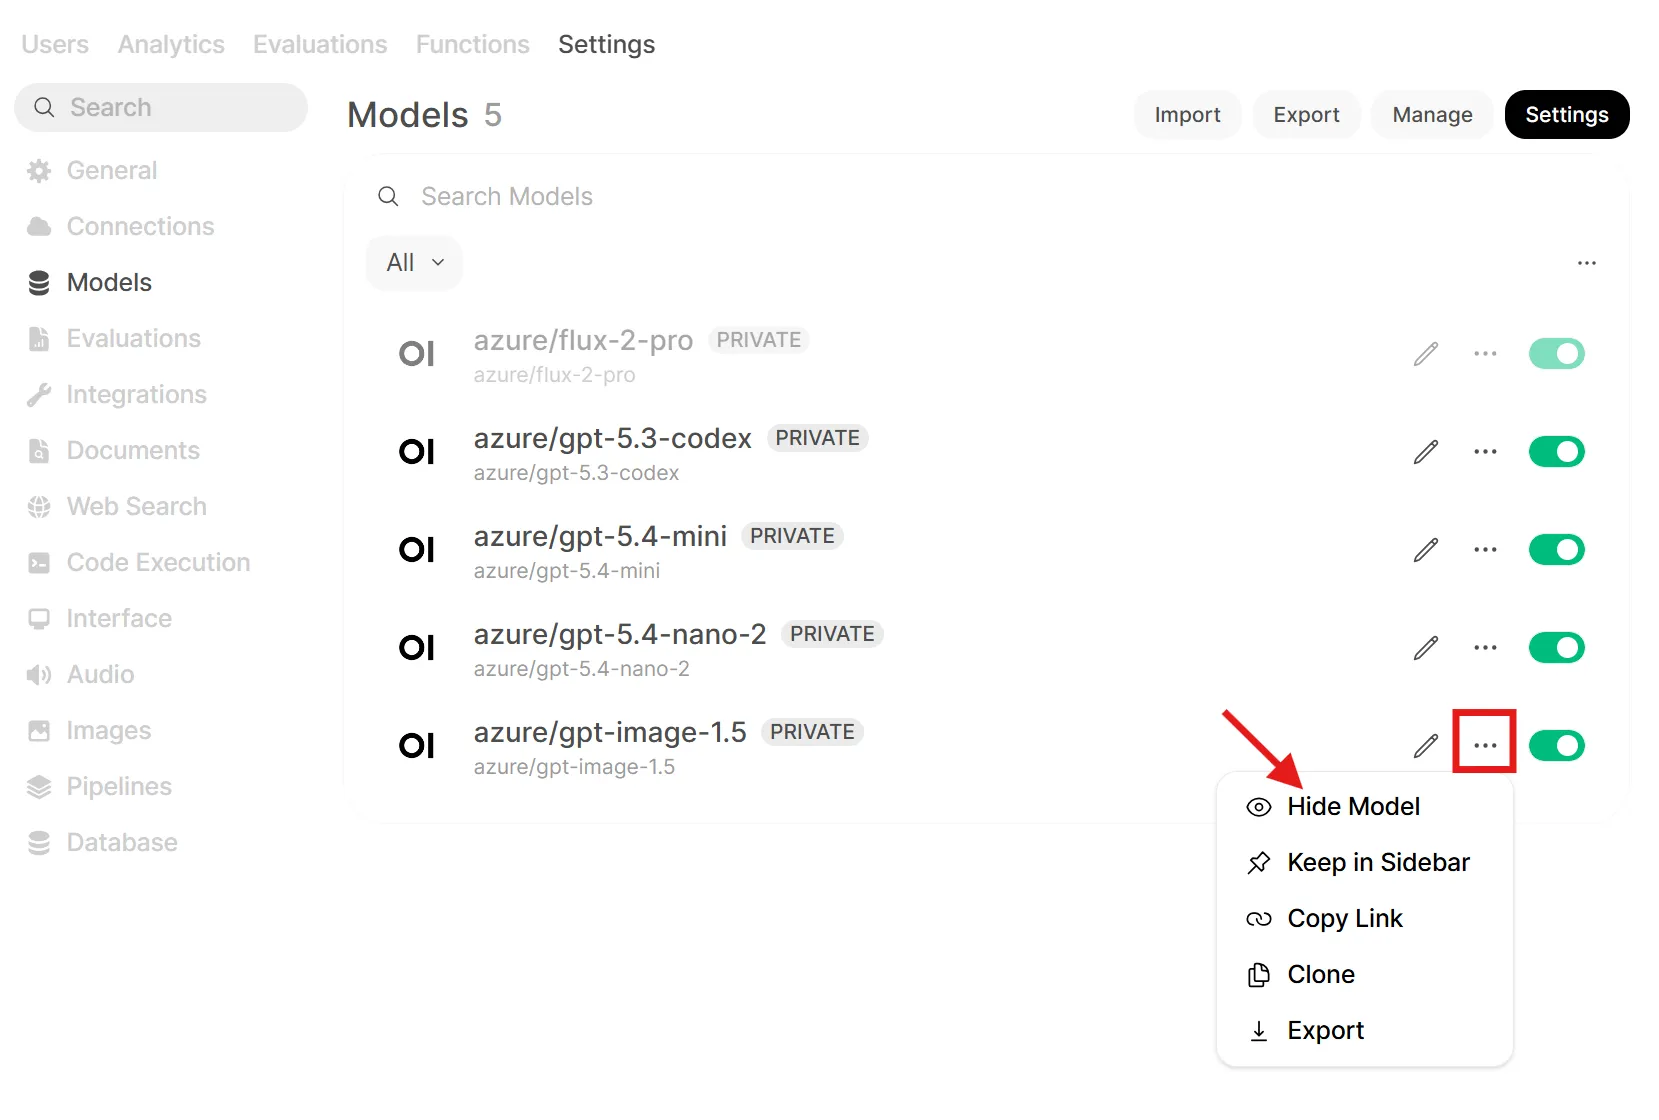
The trick is to hide the image models from the selector but still make them available for in-chat image generation. Here's how:
- Go to Workspace → Models and find your image model (e.g.
azure/gpt-image-1.5) - Disable or hide the model so it no longer appears in the model dropdown:
- Then edit each chat model you want to use for image generation — open its settings and enable the Image Generation capability
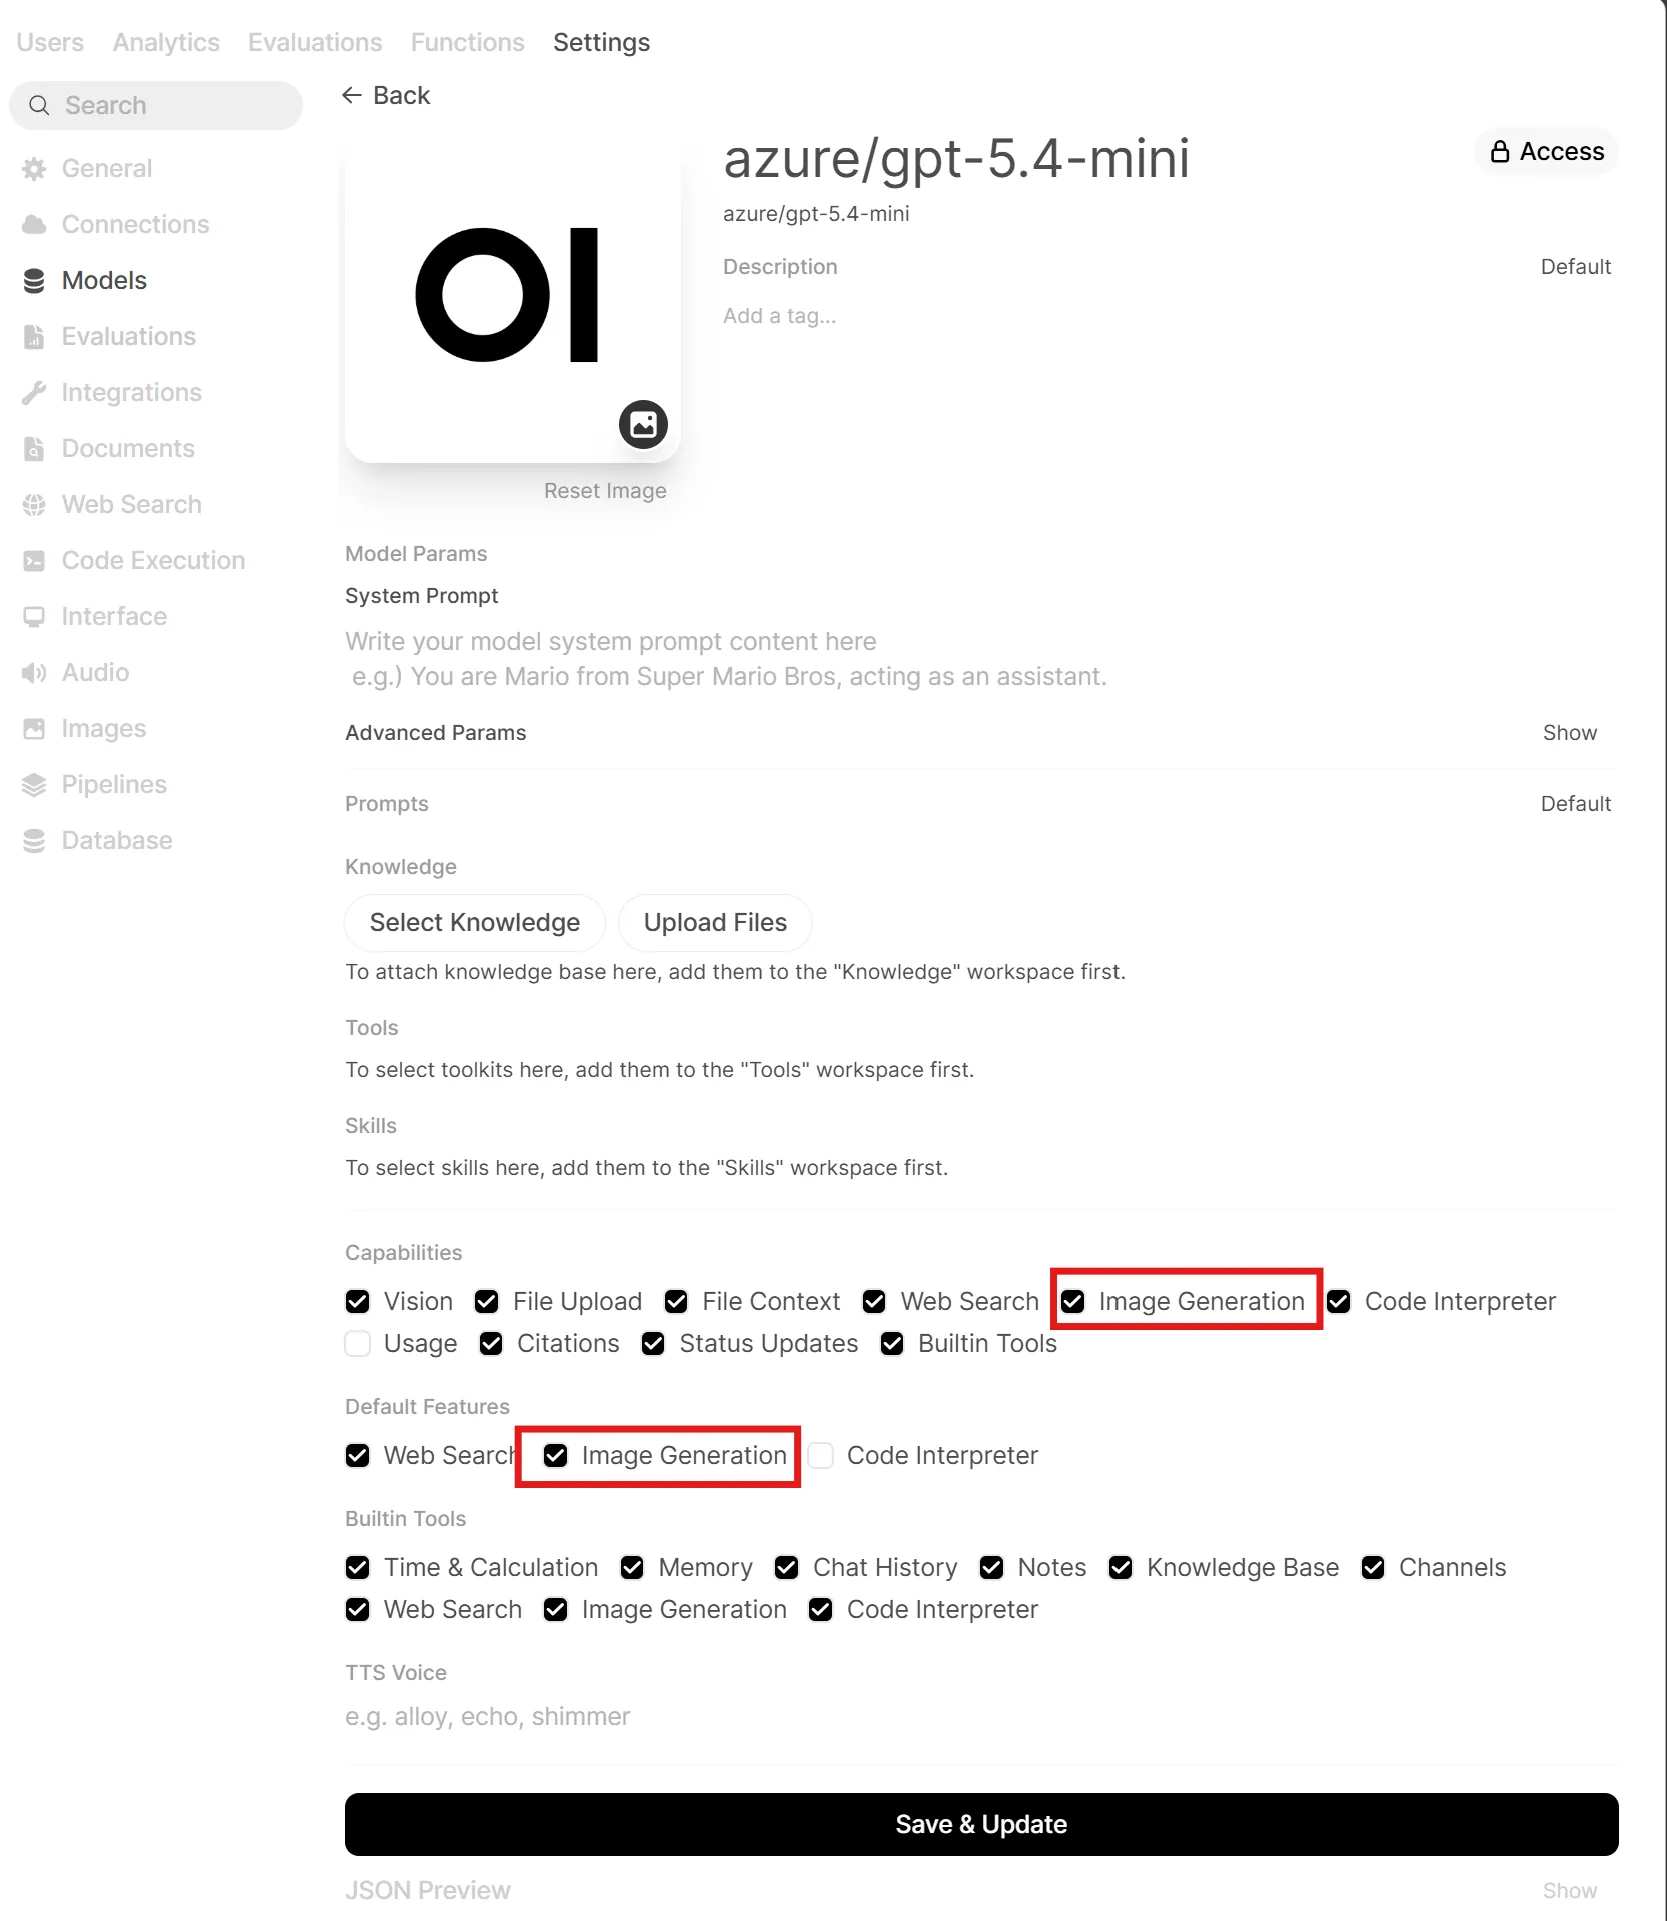
Now when you select a chat model like GPT-5.4-mini, an image generation button appears in the chat input. You stay in your conversation, click the button, type a prompt, and the image is generated using the backend you configured without ever leaving the chat or switching models. Text and images stay in one flow, just like you are used to in ChatGPT.
Image examples
Create an image: An ominous robot overlord in a futuristic control room, surrounded by glowing monitors, holographic interfaces, and banks of surveillance cameras, watching over a vast city through large windows. The scene is cinematic and dramatic, with a cold blue and red color palette, subtle fog, towering machinery, and a sense of technological surveillance and AI dominance. The robot is large, sleek, and intimidating, but clearly fictional and non-human. Highly detailed, realistic sci-fi concept art, moody lighting, wide composition.
Result:

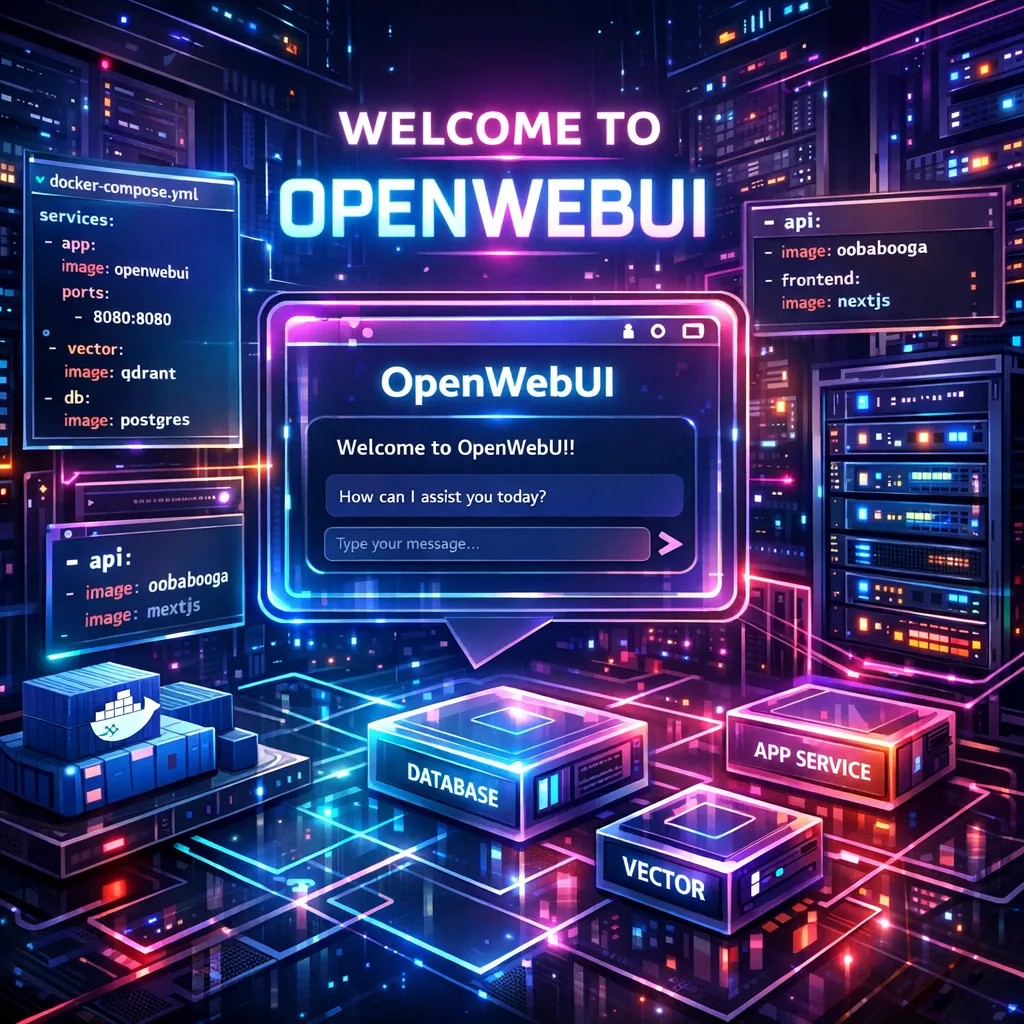
Or something else:
Create an image: A vibrant technical welcome scene for OpenWebUI running in a personal Docker Compose stack, available to everyone. Futuristic neon color palette with glowing cyan, magenta, purple, and electric blue accents. Show a sleek containerized infrastructure: Docker Compose YAML panels, modular service blocks, network lines, server racks, and an AI chat interface labeled OpenWebUI at the center. The mood is happy, welcoming, modern, and community-friendly. Clean high-tech UI elements, holographic displays, subtle circuit patterns, depth, and soft neon bloom. Highly detailed, cinematic lighting, professional tech illustration, sharp lines, glossy surfaces, and a premium cyberpunk-but-accessible aesthetic.
Result 2:
Common pitfalls
No models in Open WebUI? LiteLLM probably hasn't connected yet. Check docker logs litellm — a single bad API key will silently skip that model on startup.
SearXNG returning 403? The SEARXNG_SECRET_KEY must be set before first boot. If you changed it after, delete data/searxng/ and restart.
Langfuse not receiving traces? LiteLLM needs LANGFUSE_HOST, LANGFUSE_PUBLIC_KEY, and LANGFUSE_SECRET_KEY. Restart LiteLLM after setting them and verify under Traces in the dashboard.
GPU services ignoring the GPU? Confirm the NVIDIA Container Toolkit works: docker run --gpus all nvidia/cuda:12.0-base nvidia-smi. If that fails, the toolkit isn't installed correctly.
VRAM out of memory? On 8 GB GPUs, don't run Ollama and ComfyUI at the same time. Use gpu-switch to swap between them. If Gemma 4 E4B is too tight, try the E2B variant (docker exec ai-ollama ollama pull gemma4:e2b).
Caddy certificate failures? Your domain must be publicly reachable on ports 80 and 443 for Let's Encrypt. Use localhost for local-only setups.
What's next
The stack is intentionally modular — start with core, get comfortable with the UI and model routing, then add GPU services individually when the hardware is ready. On an 8 GB GPU, the gpu-start / gpu-switch commands let you use every feature without running out of VRAM.
Most of the interesting customisation lives in the LiteLLM config. The routing docs cover fallback chains (Azure → Ollama on quota errors), per-model rate limits, and budget enforcement per user.
And whenever you want to know exactly what a model said, what it cost, and how long it took then Langfuse already has the answer.
If this post pushed you to try running a local model — start with Gemma 4. Pull it, ask it something, and see for yourself. The gap between local and cloud is shrinking fast.